Physical Address:
ChongQing,China.
WebSite:

Just Love Coding,Love Share And Writting


I've been using the X-UI panel for a while, and overall I'm very satisfied. I made a summary while tossing. Today, this article will bring you an advanced tutorial on using X-UI to help you use X-UI better.
The highlights of today's blog include the following points:
I submitted a PR a month ago, and added to the x-ui.sh script the function of prompting to modify the panel settings after installation (to avoid too many children’s shoes using the default settings and being exploited by others) and certificate application functions, please refer to thiscommit,Now you can update the script for issuing certificates by one-key
To use the integrated certificate application function, you need to obtain Cloudlfare's API and account email information. Since the script uses the DNS API to apply, it does not depend on any network port at all. For specific usage instructions, please refer to mypernel repoillustration.To put it simply, this script saves many links. You only need to enter the following information to complete the certificate application. The schematic diagram is as follows:

At the same time, the certificate applied for by the script is a generic domain name certificate, which means that you can use this certificate for unlimited second-level domain names except your own top-level domain name,,and you can copy it to other servers for use.
When using certificates in X-UI, it is recommended that you use fullchain certificates, What is a fullchain certificate? In fact, it is a certificate that contains the content of the entire certificate chain. As shown below:

The advantage of using the fullchain certificate is that it can avoid the connection failure caused by the certificate problem to the greatest extent.
In addition, when setting the node certificate, in addition to using the certificate path, you can also copy the contents of the public key and key certificate into the corresponding settings for use. However, this is inconvenient to use, and the best practice is to use the path, so that even if the certificate is updated, you do not need to perform secondary settings.
It should be noted that the currently applied certificate is actually RSA symmetric encryption. If you need to apply for an ECC certificate (personally think it is not necessary), you need to refer to the official documentation of acme to apply.
In the use of X-UI, the firewall settings are very important. Setting up a firewall is to protect the security of our server, and it is also to protect the security of our panel. In the use of X-UI, the settings of the protective wall include:
1) Panel login port: It is generally recommended to set the X-UI panel login port to the HTTPS port permitted by Cloudflare, such as 443, 2053, 2083, 2087, 2096 and 8443. In this way, if we need to open the CDN, we can access the panel normally. Regarding the firewall settings, I recommend using UFW for management and settings. Take the Ubantu system as an example:
Install the UFW firewall tool:
sudo apt-get update && sudo apt install ufwEnable UFW firewall:
sudo ufw enableOpen panel port for listiening(Take port 8443 as an example):
ufw allow from xx.xxx.xx.xx to any port 8443Here, the IP address xx.xxx.xx.xx is actually added to the whitelist (allow means firewall will let it go), which restricts only specific IPs to access the panel login port.When using X-UI, I recommend that you add several of your own servers to the whitelist, so that you can enter your panel through different server nodes. In fact, if you don't add any whitelists, then you only have access to control your panel through the nodes set on the panel. For the sake of insurance (such as the node set by the panel is blocked, the port or IP is blocked), you'd better add your other servers to the whitelist. Once an unexpected situation occurs, you can still access the panel through the nodes of other services. to modify. You can take a look at my UFW settings:
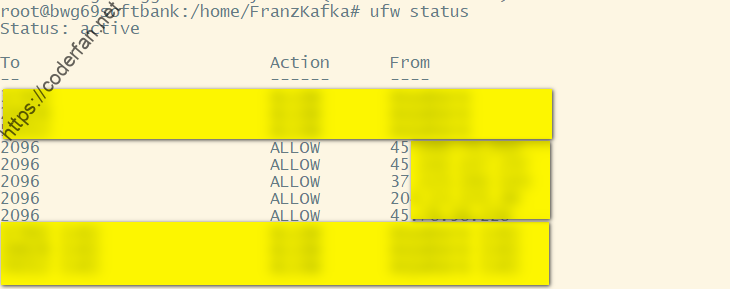
Here my panel listiening port is set to 2096, and my other servers are added to the whitelist.
It should be noted that after enabling UFW, be sure to open your SSH access port and your node port。
Check out the current UFW settings:
sudo ufw statusIt should be noted that the log here is not the log of X-UI itself, but the log of the Xray program. Sometimes in order to troubleshoot problems or check status, we have to enable Xray logging. If we need to open the log, we need to modify the configuration template in the panel console, as shown in the following figure:
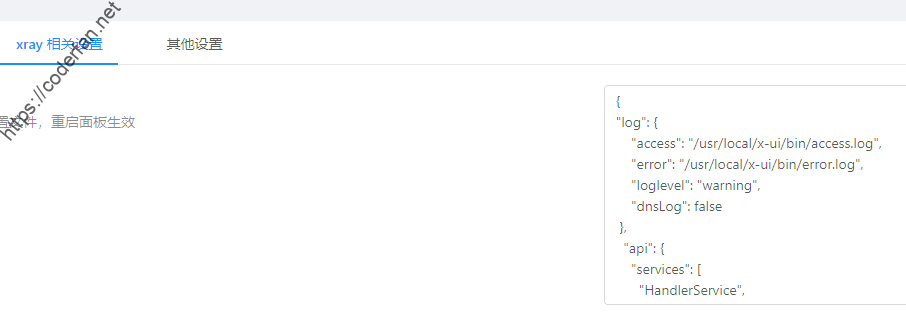
In the configuration template, we added log related fields, such as my settings are as follows:
"log": {
    "access": "/usr/local/x-ui/bin/access.log",
    "error": "/usr/local/x-ui/bin/error.log",
    "loglevel": "warning",
    "dnsLog": false
 }
Here access sets the access log, error sets the error log,loglevel is used to set the log level, warning is recommended, and dnsLog is used to set the DNS query log, which is recommended to be false. If you have requirements such as fakeDNS/DoH/DoT, it is recommended to set it to true.
After setting, we restart the panel, enter the corresponding directory of the server to view the log, and you can see the following information:
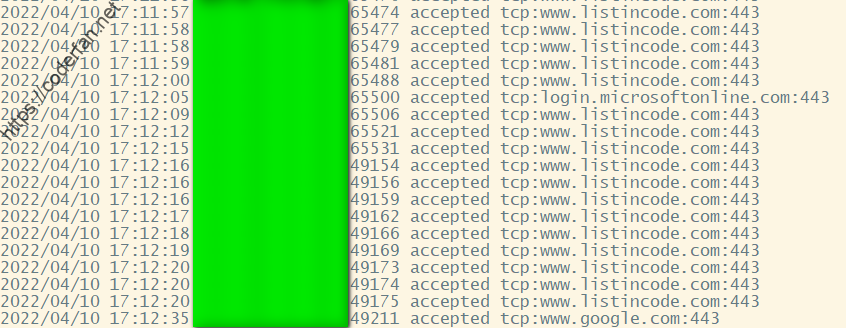
The coded part here is the IP of the client, and the right side is the specific information of the access. Since the current X-UI will use Xray's API for traffic query later, it will cause many duplicate and useless logs in the log. We can use the following command to filter the output:
sudo cat access.log | grep -v 127.0.0.1 View all rejected connections:
sudo cat access.log | grep rejectedThe output is as shown in the figure:

I recommend that you check your node logs from time to time, especially for connections refused. To a large extent, it comes from the detection of the wall. If you find this kind of detection, it is recommended that you add it to the list through UFW or Fail2ban.
In addition, in order to make it easier for us to view the logs, it is recommended that you change the time zone of the server to your own time zone, which will be of great help for us to view the logs.
Here is another point to mention. After the log is turned on, the log will continue to accumulate. If it is not cleaned up for a long time, it will cause unnecessary memory consumption. Use my script to set, execute the following command in the root directory:
cd /usr/local/x-ui/bin && wget https://github.com/FranzKafkaYu/BashScripts/blob/main/FileManuplite/autoCheck.shIt should be noted that if the directory set by your log is inconsistent with mine, please modify the script yourself to adapt. After modification, please use the command -crontab -e:to adds the following scheduled tasks:
00 0 * * 6 /usr/local/x-ui/bin/autoCheck.sh >> /usr/local/x-ui/bin/autoCheck.logAfter the setting is completed, the log size can be automatically detected and deleted, and X-UI will be restarted by itself when deleting to ensure the smooth operation of X-UI.
The node setting is actually a very complicated issue. Due to some limitations of the current X-UI, the advantages of Xray cannot be fully utilized. However, there are still some points to be aware of, including:
1. Try to choose a high port, if you need to set a fallback, try to use port 443 as the exposed port
2. Set the expiration time, change the password or port after the expiration
3. Try not to use xtls. According to the latest usage and issue submissions, xtls has certain risks.
In addition to the above, there are some other points that can be noted, including
1. Regularly update the geoip.dat and geosite.dat resource files
This can be done by adding the following cron tasks:
30 9 * * * /usr/bin/curl -s -L -o /usr/local/x-ui/bin/geoip.dat https://github.com/Loyalsoldier/v2ray-rules-dat/releases/latest/download/geoip.dat30 9 * * * /usr/bin/curl -s -L -o /usr/local/x-ui/bin/geosite.dat https://github.com/Loyalsoldier/v2ray-rules-dat/releases/latest/download/geosite.dat2. Please open CDN during emergency
At some important time points, the movement of the wall may increase. At this time, try to open the CDN for use. Although turning on CDN will inevitably reduce the speed, but it can ensure security to the greatest extent, don't forget to use ws+TLS to turn on CDN~
3. Be sure to turn on BBR acceleration
The gain of bbr is actually very large. The X-UI script integrates the function of turning on BBR with one click. Please be sure to turn it on.
The above is the content of this blog~
In addition, since the development progress of the original author has slowed down, I am also learning the go language myself, so I forked the original author's warehouse and updated the functions. The current expanded functions include
At the same time, the issue area has also been opened. I hope you can use it and give me feedback. I will make PR to the original warehouse from time to time to improve X-UI together.,project rgithub address pleaseclick here


I really enjoyed so much creativity and innovation you
You’ve got all the right moves.
There is only a small problem in popups display/value member not changing with selected index of combo box
Overall, it’s great and of course useful , Thank you
Hi, thanks alot for your explanation.
I wanna take backup from inbound nodes and restore them on another server without creating and changing nodes one by one
could you please help me?
I`m using ubuntu.
thank you inadvance.
Just backup /etc/x-ui/x-ui.db and import it to another server,that’s enough.you can find more info in my github wiki.
如果发现这种探测,建议大家通过UFW或者Fail2ban将其加入给名单。
这句话是不是漏了啥关键字?
Thanks a lot! It was really helpful.
How can i see inbound’s id or remark as well as ip address in access log?
If you have set up log correctly,you can distinguish users by Email,which is configured in inbounds.
Thank’s for answering.
I’m all new to all this. I couldn’t find such settings to add email for my users in my panel .How can i do it?
it depends on which version do you use,my repo support such feature.
I use vaxilu version.
How can i add this feature?
Adding email for users in terminal will do the job; How can i do this?
vaxilu version doesn’t support such function,if you need such function,you need use my version instead.
你好,我想知道 每个端口最多为3个用户 这个能否自己修改为多个用户?在哪里修改的?谢谢了
请自行修改源码,我的版本不打算放开限制。
Hi Thanks a lot! It was really helpful, How can i add email?
install my latest version and when you add user there would be a email option.
thanks alot for your explanation, where i can find your latest version
please check my github repo:https://github.com/FranzKafkaYu/x-ui
how can I limit 2 users only use a url configuration ?
how limit 2users on trojan ? and how work email on configure ? and how see how many are online device ?
is it possible to use x-ui.db file on another vps? when i replace x-ui.db x-ui service wont start
“需要说明的是,如果你的日志设定的目录与我的不一致,请自行修改该脚本进行适配。修改之后请通过conrtab -e命令加入如下定时任务:”
bro,这里是crontab -e不是conrtab -e
how can i edit HTML files for the web panel? i want to add some items to the panel i cant find the html and assets files.
/web/assets/html,but I didn’t release my code.so you can’t edit in my version.I’m Sorry.
Hello
Why the version
XTLS/Xray-core
Can’t update to the last version
https://github.com/HexaSoftwareTech/x-ui
I don’t know, you should ask the Author,not me.
您好,今天在看您的GitHub文档时顺手点了加入群组,但是由于在看GitHub,没看见无名机器人的验证,现在被ban了,用户名是@mumu9615,可否帮助解除禁止,谢谢您的付出!
请教一下,x-ui是很久没更新了嘛?
https://github.com/FranzKafkaYu/x-ui
我基于原版进行覆盖升级时不成功,显示下载安装文件失败,不知道有谁成功过吗?
大哥,我想问一下,新版的xui能实现api访问,
上传/下载量,总用量(上传+下载),到期时间吗?
未对外开放API.
想改tg bot的源码 是在哪里? 找了一通没找到 现在还是go小白
已經在防火牆加入XUI port, 請問為何白屏
大佬请收下我的双膝
你好,想问问就是我的证书可以申请下来,但是在网页上还是显示https不安全,是因为什么原因吗?
感谢你对xui的工作。
thanks for your work on xui.