Physical Address:
ChongQing,China.
WebSite:

Just Love Coding,Love Share And Writting


VTS (Vendor Test Suite)由一套测试框架和测试用例组成,目的是提高安卓系统 ( 如核心硬件抽象层HAL和依赖库libraries ) 与底层系统软件(如,内核kernel,模块modules,固件firmware等)的健壮性,可依赖性和依从性。
Google推出VTS的很重要的一点是由于各Soc厂商对于HAL(Hardware Abstract Layer)的实现都是不同的,为了保证Framework乃至App的正常运行,需要确保各个厂商对于HAL的实现满足规范,基于此推出了VTS,同时也设定了相应的流程认证体系来保证各个厂商对于VTS测试的合规性。
VTS有两种测试套件:
1.自动化测试(如record-and-replay and fuzzing)
2.结构化测试(如gtest and host-driven python)
VTS框架和测试用例是为userdebug或者eng版本的设备而设计的,当然其中有些测试用例可以在user版本下执行,此时需要使用相对应的应用软件,也就是VTS Agent APP。在本示例中,以userdebug版本为例,进行自动化测试。
VTS的测试原理简单来讲就是通过编写测试代码,从而与硬件HAL程序进行交互,以测试其接口是否能正常工作;这意味着我们需要接入实际的物理硬件,并运行安卓系统,同时确保我们自己实现的HAL程序正常运行。
而各个模块的VTS的测试代码都是分散的,一般我们可以在hardware/interfaces/MODULE_NAME/VERSION/vts/functional/目录下找到对应的测试用例代码。以Camera HAL为例:
root:~/Android12.1/hardware/interfaces/camera/provider/2.4/vts/functional$ ls -lahtotal 408Kdrwxrwxr-x 2 4.0K Aug 10 10:55 .drwxrwxr-x 3 4.0K Aug 10 10:55 ..-rw-rw-r-- 1 2.3K Aug 10 10:55 Android.bp-rw-rw-r-- 1 1.6K Aug 10 10:55 AndroidTest.xml-rw-rw-r-- 1 391K Aug 10 10:55 VtsHalCameraProviderV2_4TargetTest.cpproot:~/Android12.1/hardware/interfaces/camera/provider/2.4/vts/functional$ ls -lah total 408K drwxrwxr-x 2 4.0K Aug 10 10:55 . drwxrwxr-x 3 4.0K Aug 10 10:55 .. -rw-rw-r-- 1 2.3K Aug 10 10:55 Android.bp -rw-rw-r-- 1 1.6K Aug 10 10:55 AndroidTest.xml -rw-rw-r-- 1 391K Aug 10 10:55 VtsHalCameraProviderV2_4TargetTest.cpp
这里VtsHalCameraProviderV24TargetTest.cpp即是测试代码的源码文件;所有的Test Case都以TEST_P开头,如下所示:
// In case autofocus is supported verify that it can be cancelled.TEST_P(CameraHidlTest, cancelAutoFocus) {hidl_vec<hidl_string> cameraDeviceNames = getCameraDeviceNames(mProvider);for (const auto& name : cameraDeviceNames) {if (getCameraDeviceVersion(name, mProviderType) == CAMERA_DEVICE_API_VERSION_1_0) {sp<::android::hardware::camera::device::V1_0::ICameraDevice> device1;openCameraDevice(name, mProvider, &device1 /*out*/);ASSERT_NE(nullptr, device1.get());CameraParameters cameraParams;getParameters(device1, &cameraParams /*out*/);if (Status::OK !=isAutoFocusModeAvailable(cameraParams, CameraParameters::FOCUS_MODE_AUTO)) {Return<void> ret = device1->close();ASSERT_TRUE(ret.isOk());continue;}// It should be fine to call before preview starts.ASSERT_EQ(Status::OK, device1->cancelAutoFocus());sp<BufferItemConsumer> bufferItemConsumer;sp<BufferItemHander> bufferHandler;setupPreviewWindow(device1, &bufferItemConsumer /*out*/, &bufferHandler /*out*/);startPreview(device1);// It should be fine to call after preview starts too.Return<Status> returnStatus = device1->cancelAutoFocus();ASSERT_TRUE(returnStatus.isOk());ASSERT_EQ(Status::OK, returnStatus);returnStatus = device1->autoFocus();ASSERT_TRUE(returnStatus.isOk());ASSERT_EQ(Status::OK, returnStatus);returnStatus = device1->cancelAutoFocus();ASSERT_TRUE(returnStatus.isOk());ASSERT_EQ(Status::OK, returnStatus);stopPreviewAndClose(device1);}}}// In case autofocus is supported verify that it can be cancelled. TEST_P(CameraHidlTest, cancelAutoFocus) { hidl_vec<hidl_string> cameraDeviceNames = getCameraDeviceNames(mProvider); for (const auto& name : cameraDeviceNames) { if (getCameraDeviceVersion(name, mProviderType) == CAMERA_DEVICE_API_VERSION_1_0) { sp<::android::hardware::camera::device::V1_0::ICameraDevice> device1; openCameraDevice(name, mProvider, &device1 /*out*/); ASSERT_NE(nullptr, device1.get()); CameraParameters cameraParams; getParameters(device1, &cameraParams /*out*/); if (Status::OK != isAutoFocusModeAvailable(cameraParams, CameraParameters::FOCUS_MODE_AUTO)) { Return<void> ret = device1->close(); ASSERT_TRUE(ret.isOk()); continue; } // It should be fine to call before preview starts. ASSERT_EQ(Status::OK, device1->cancelAutoFocus()); sp<BufferItemConsumer> bufferItemConsumer; sp<BufferItemHander> bufferHandler; setupPreviewWindow(device1, &bufferItemConsumer /*out*/, &bufferHandler /*out*/); startPreview(device1); // It should be fine to call after preview starts too. Return<Status> returnStatus = device1->cancelAutoFocus(); ASSERT_TRUE(returnStatus.isOk()); ASSERT_EQ(Status::OK, returnStatus); returnStatus = device1->autoFocus(); ASSERT_TRUE(returnStatus.isOk()); ASSERT_EQ(Status::OK, returnStatus); returnStatus = device1->cancelAutoFocus(); ASSERT_TRUE(returnStatus.isOk()); ASSERT_EQ(Status::OK, returnStatus); stopPreviewAndClose(device1); } } }
简单看一下这些测试代码,我们会发现大量类似与断言ASSERT的写法,这是VTS测试框架下的测试桩点,如果ASSERT_XX的部分未能达到预期,则会测试失败。
首先我们需要编译测试工具,相关源码已在AOSP源码树中:
1.cd ${AOSP_SRC_TOP_DIR} && source build/envsetup.sh2.lunch PRODUCT_NAME3.make vts -j321.cd ${AOSP_SRC_TOP_DIR} && source build/envsetup.sh 2.lunch PRODUCT_NAME 3.make vts -j32
最终的生成产物位于: ${AOSP_SRC_TOP_DIR}/out/target/${PRODUCT_NAME}/testcases文件夹内;在该目录下我们可以看到每个模块对应的vts测试文件,我们可以将其推入我们的Android环境内手动进行执行;如下所示:
root:/data # ./VtsHalEvsV1_1TargetTestRunning main() from external/googletest/googletest/src/gtest_main.cc[==========] Running 34 tests from 1 test suite.[----------] Global test environment set-up.[----------] 34 tests from PerInstance/EvsHidlTest[ RUN ] PerInstance/EvsHidlTest.CameraOpenClean/0_default……root:/data # ./VtsHalEvsV1_1TargetTest Running main() from external/googletest/googletest/src/gtest_main.cc [==========] Running 34 tests from 1 test suite. [----------] Global test environment set-up. [----------] 34 tests from PerInstance/EvsHidlTest [ RUN ] PerInstance/EvsHidlTest.CameraOpenClean/0_default ……
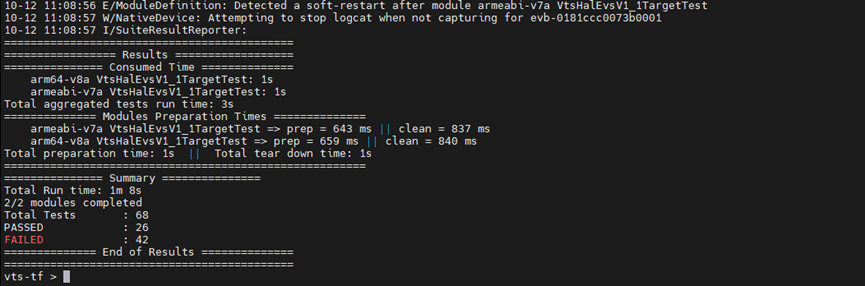
在完整的测试完成后,会输出总结,包含成功项与失败项,以及失败的具体项目明细;
上述测试流程比较适合每个模块对自己负责的模块进行测试,但是无法或者说不便于一次性对所有的模块进行测试;Google为此也提供了其他更为方便的方式进行测试。
如果我们的编译环境已经接入了Android ADB设备,此时,我们可以在编译环境内直接执行vts-tradefed命令;如果我们的编译环境未接入Android ADB设备,我们可以找到${AOSP_SRC_TOP_DIR}/out/host/linux-x86/cts/android-vts.zip,将其拷贝到其他接入了Android ADB设备的Linux服务器,解压后手动执行vts-tradefed,如下所示:

此时我们会进入一个二级控制台,执行run vts命令即开始vts测试,这时执行的vts将会是全量的,会自动针对每个模块进行测试;如果我们需要执行某个单独的模块,可以使用:run vts -m MODULE_NAME的方式执行单个模块的vts测试,在执行完成之后,我们可以看到具体的执行结果;如下所示:
在执行VTS的过程中,我们难免会遇到一些fail项,针对测试失败的测试用例,我们在测试结果中可以看到具体的错误信息,包含行号,期待结果与实际结果等信息,如下所示:
[ RUN ] PerInstance/EvsHidlTest.CameraOpenClean/0_defaulthardware/interfaces/automotive/evs/1.1/vts/functional/VtsHalEvsV1_1TargetTest.cpp:317: FailureExpected: (pCam) != (nullptr), actual: 8-byte object <00-00 00-00 00-00 00-00> vs (nullptr)[ FAILED ] PerInstance/EvsHidlTest.CameraOpenClean/0_default, where GetParam() = "default" (3 ms)[ RUN ] PerInstance/EvsHidlTest.CameraOpenClean/1_hw_1hardware/interfaces/automotive/evs/1.1/vts/functional/VtsHalEvsV1_1TargetTest.cpp:312: FailureExpected: (targetCfg.width) > (0), actual: 0 vs 0[ FAILED ] PerInstance/EvsHidlTest.CameraOpenClean/1_hw_1, where GetParam() = "hw/1" (1 ms)[ RUN ] PerInstance/EvsHidlTest.CameraOpenClean/0_default hardware/interfaces/automotive/evs/1.1/vts/functional/VtsHalEvsV1_1TargetTest.cpp:317: Failure Expected: (pCam) != (nullptr), actual: 8-byte object <00-00 00-00 00-00 00-00> vs (nullptr) [ FAILED ] PerInstance/EvsHidlTest.CameraOpenClean/0_default, where GetParam() = "default" (3 ms) [ RUN ] PerInstance/EvsHidlTest.CameraOpenClean/1_hw_1 hardware/interfaces/automotive/evs/1.1/vts/functional/VtsHalEvsV1_1TargetTest.cpp:312: Failure Expected: (targetCfg.width) > (0), actual: 0 vs 0 [ FAILED ] PerInstance/EvsHidlTest.CameraOpenClean/1_hw_1, where GetParam() = "hw/1" (1 ms)
如上述的错误显示,在VtsHalEvsV1_1TargetTest.cpp,CameraOpenClean 测试中,以default和hw/1两种硬件状态进行测试,测试执行结果都失败,两者失败的原因都不一样。
前者:具体fail的源码位于 VtsHalEvsV1_1TargetTest.cpp第317行,
Expected: (pCam) != (nullptr), actual: 8-byte object <00-00 00-00 00-00 00-00> vs (nullptr)Expected: (pCam) != (nullptr), actual: 8-byte object <00-00 00-00 00-00 00-00> vs (nullptr)
后者: 具体fail的源码位于 VtsHalEvsV1_1TargetTest.cpp第312行,
Expected: (targetCfg.width) > (0), actual: 0 vs 0Expected: (targetCfg.width) > (0), actual: 0 vs 0
通过这些错误信息,我们可以直接找到测试代码的位置查看代码执行逻辑,结合HAL日志来进行问题定位。