Physical Address:
ChongQing,China.
WebSite:

Just Love Coding,Love Share And Writting


在安卓系统开发过程中,难免会涉及到安卓系统内部的网络栈。比如我们需要了解其网卡配置的IP地址,网关地址,DNS配置等等。当我们的安卓设备接入局域网时,一般都会由DHCP Server下发这些配置,安卓系统内的网络栈会解析这些配置并将其作用于系统。但在某些场景下,可能没办法通过DHCP完成配置或者说我们需要针对网络栈进行系统定制,此时我们就需要考虑自定义网卡默认配置。
在我们开始进行自定义网卡默认配置前,我们应当了解当前安卓系统是如何去检测、识别网卡并进行配置的。
在安卓12中,整体网络堆栈参考如下:
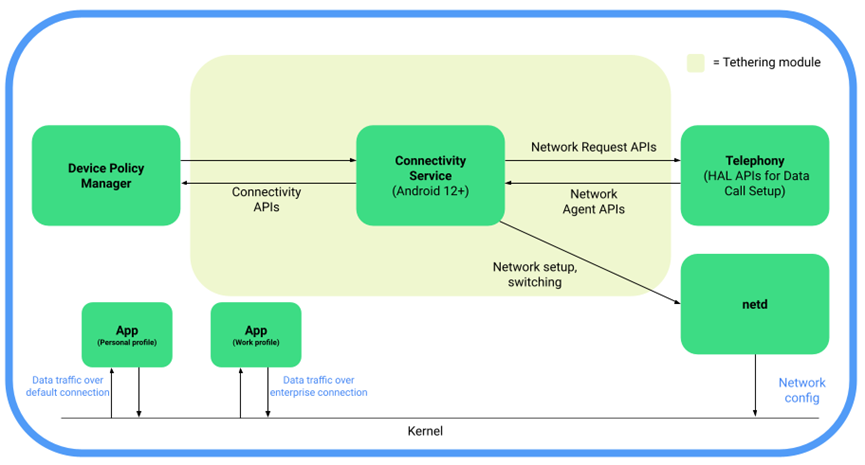
大体可以分为四部分:
Java Framework API:向应用提供android.net.*的API支持,其源码大部分位于/frameworks/base/core/java/android/net内,可以提供如IP配置、DNS配置、DHCP通信、SSL管理、VPN配置等相关接口。
Java Framework Service:面向应用与API的service实现,源码比较分散,包括frameworks/base/services/core/java/com/android/server/net与frameworks/base/services/core/java/com/android/server/connectivity等,提供如NetworkManagementService,VpnService等服务;
Java Framework NetworkStack:提供安卓系统完整网络栈,包含DHCP,IP,DNS,Mac,Qos,Route以及网络状态检测等诸多能力,是整个网络栈的核心部分。其源码位于packages/modules/NetworkStack内,会被编译成为NetworkStack.apk集成至系统内部。
Native Framework:系统网络栈在C++层的服务支持,名为netd,其源码位于/system/netd/server内。向下对接内核网络栈,向上接入NetworkStack。
在了解其大体的网络栈之后,我们来看看网络栈针对网卡配置的设置流程,具体流程可以参考下图:

在整个流程中,比较关键的几个模块说明如下:
NetlinkManager:位于Netd服务内,其主要作用是监控由内核上报的Uevent,由此监听网卡设备的状态变化,并进行上报。
NetworkManagementService:属于系统核心服务的一个组件,提供网卡配置、状态变化监听等能力;当Netd监听到新的网卡设备时,就会通过onInterfaceAdded接口通知后端进行后续处理;
EthernetTracker:负责以太网接口管理与配置解析、设置,在新的以太网卡设备接入时,该模块会下发默认配置,从而让以太网卡正常工作。
当新增interface时,会进入到EthernetTracker的maybeTrackerInterface方法内,通过updateIpConfiguration方法设置IP配置;updateIpConfiguration内会将从/data/misc/ethernet/ipconfig.txt读取的配置(由EtherConfigStore类管理)和从XML配置字段config_ethernet_interfaces设定的配置(由IpConfiguration类管理)相结合,从而配置网卡设备。如下所示:
//网卡设备状态监听回调处理
private void maybeTrackInterface(String iface) {
	if (!iface.matches(mIfaceMatch)) {
		return;
	}

	// If we don't already track this interface, and if this interface matches
	// our regex, start tracking it.
	if (mFactory.hasInterface(iface) || iface.equals(mDefaultInterface)) {
		if (DBG) Log.w(TAG, "Ignoring already-tracked interface " + iface);
		return;
	}
	if (DBG) Log.i(TAG, "maybeTrackInterface: " + iface);

	// TODO: avoid making an interface default if it has configured NetworkCapabilities.
	if (mDefaultInterface == null) {
		mDefaultInterface = iface;
	}

	if (mIpConfigForDefaultInterface != null) {
		updateIpConfiguration(iface, mIpConfigForDefaultInterface);
		mIpConfigForDefaultInterface = null;
	}

	addInterface(iface);
}


//更新IpConfiguration
void updateIpConfiguration(String iface, IpConfiguration ipConfiguration) {
	if (DBG) {
		Log.i(TAG, "updateIpConfiguration, iface: " + iface + ", cfg: " + ipConfiguration);
	}
       //将ipconfig.txt的配置写入
	mConfigStore.write(iface, ipConfiguration);
       //将config_ethernet_interfaces的配置写入
	mIpConfigurations.put(iface, ipConfiguration);

	mHandler.post(() -> mFactory.updateIpConfiguration(iface, ipConfiguration));
}
现在我们已经对网卡的配置流程有了一个大概的了解,接下来就是实现我们自定义的配置。简单来讲,我们有两种配置方式,一是通过XML配置的方式,二是通过ipconfig.txt配置的方式。
方式一:通过XML进行配置
在EthernetTracker构造函数内,会通过xml配置内的config_ethernet_interfaces字段解析interface的配置,如下所示:
// Read default Ethernet interface configuration from resources
final String[] interfaceConfigs = context.getResources().getStringArray(
com.android.internal.R.array.config_ethernet_interfaces);
for (String strConfig : interfaceConfigs) {
       parseEthernetConfig(strConfig);
}
关于config_ethernet_interface的配置格式,我们可以看一下官方定义:
<!-- Configuration of Ethernet interfaces in the following format:
<interface name|mac address>;[Network Capabilities];[IP config];[Override Transport]
[Network Capabilities] Optional. A comma seprated list of network capabilities.
   Values must be from NetworkCapabilities#NET_CAPABILITY_* constants.
   The NOT_ROAMING, NOT_CONGESTED and NOT_SUSPENDED capabilities are always
   added automatically because this configuration provides no way to update
   them dynamically.
[IP config] Optional. If empty or not specified - DHCP will be used, otherwise
   use the following format to specify static IP configuration:
       ip=<ip-address/mask> gateway=<ip-address> dns=<comma-sep-ip-addresses>
       domains=<comma-sep-domains>
[Override Transport] Optional. An override network transport type to allow
    the propagation of an interface type on the other end of a local Ethernet
    interface. Value must be from NetworkCapabilities#TRANSPORT_* constants. If
    left out, this will default to TRANSPORT_ETHERNET.
 -->
<string-array translatable="false" name="config_ethernet_interfaces">
<!--
<item>eth1;12,13,14,15;ip=192.168.0.10/24 gateway=192.168.0.1 dns=4.4.4.4,8.8.8.8</item>
<item>eth2;;ip=192.168.0.11/24</item>
</string-array>
这里我们可以看到config_ethernet_interface的配置包括四个子项,第一项是网卡名或者mac地址;第二项是Network Capability;第三项是IP 配置;第四项是network transport配置。
第一项配置没有太多可深究的,interface名称即是常见的如eth0,eth1等,这里我们使用mac地址也是可以的;第二项需要配置的是NetWork Capability,该配置影响的是网络框架的能力,具体配置时需要依据packages/modules/Connectivity/framework/src/android/net/NetworkCapabilities.java中的定义进行配置,在这个示例中eth1配置的Network Compatility具体定义如下:
/**
* Indicates that this network should be able to reach the internet.
*/
    public static final int NET_CAPABILITY_INTERNET  = 12;

/**
* Indicates that this network is available for general use.  If this is not set
* applications should not attempt to communicate on this network.  Note that this
* is simply informative and not enforcement - enforcement is handled via other means.
* Set by default.
*/
public static final int NET_CAPABILITY_NOT_RESTRICTED = 13;

/**
* Indicates that the user has indicated implicit trust of this network.  This
* generally means it's a sim-selected carrier, a plugged in ethernet, a paired
* BT device or a wifi the user asked to connect to.  Untrusted networks
* are probably limited to unknown wifi AP.  Set by default.
*/
public static final int NET_CAPABILITY_TRUSTED   = 14;

/**
* Indicates that this network is not a VPN.  This capability is set by default and should be
* explicitly cleared for VPN networks.
*/
public static final int NET_CAPABILITY_NOT_VPN   = 15;
第三项配置就是我们最需要关注的了,也就是IP配置,虽然是IP配置,但其实可配置的内容可以包括IP,domains,gateway网关与dns配置,IP配置的格式参考为:
* ip=<ip-address/mask> gateway=<ip-address> dns=<comma-sep-ip-addresses>
*     domains=<comma-sep-domains>}
具体的配置解析过程可以参考frameworks/opt/net/ethernet/java/com/android/server/ethernet/EthernetTracker.java内的parseStaticIpConfiguration方法;
需要说明的是,一般我们在通过xml配置静态IP时,是通过overlay的方式去进行配置的,关于Overlay的配置实现可请参考我的文章。
方式二:通过EthernetConfigStore结合二进制文件ipconfig.txt进行配置
此方式涉及的源码包括如下:
frameworks/opt/net/ethernet/java/com/android/server/ethernet/EthernetConfigStore.java
frameworks/base/services/core/java/com/android/server/net/IpConfigStore.java
EthernetConfigStore类是专门用于存储和管理Ethernet配置的,也包括IP配置,其提供的read方法用于从/data/misc/ethernet/ipconfig.txt中读取配置信息,源码如下:
public class EthernetConfigStore {
private static final String ipConfigFile = Environment.getDataDirectory() +"/misc/ethernet/ipconfig.txt";
…
public void read() {
	synchronized (mSync) {
		ArrayMap<String, IpConfiguration> configs =
		IpConfigStore.readIpConfigurations(ipConfigFile);
		// This configuration may exist in old file versions when there was only
                // a single active
		// Ethernet interface.
		if (configs.containsKey("0")) {
			mIpConfigurationForDefaultInterface = configs.remove("0");
		}
		mIpConfigurations = configs;
	}
}
}配置文件的解析位于IpConfigStore.java内,该类提供了readIpConfigurations方法用于解析,由于ipconfig.txt是经过编码转换后的文件,直接打开是无法看到其准确信息的,这里我们可以借助这个开源项目来帮助我们生成ipconfig.txt文件。