Physical Address:
ChongQing,China.
WebSite:

Just Love Coding,Love Share And Writting


在安卓系统中,我们与用户的交互除了界面上UI/UE的直观展示,还有按键/触屏音的互动。按键音可以帮助用户更好地感知当前操作,判断点击行为是否有效。对于开发人员而言,当画面卡滞时可以借由按键音判断系统是否仍在运行,如Input输入是否存在异常,Audio系统是否正常工作等,便于后续问题排查。
在Android系统上层,开发人员一般不需要去关注系统按键音是如何实现的。由于Android系统良好的封装性,开发人员无须做任何额外设定即可让自己的View控件携带按键音。但在某些时候,我们需要在Native层实现按键音播放。今天这篇文章将为大家介绍如何在Android Native中实现按键音。
在我们开始实现自己的按键音播放前,不妨先了解一下原生系统中是如何实现按键音播放的。通过对原生系统按键音播放的学习,我们再来思考如何实现Native中播放按键音的需求。
废话不多说,这里先给大家上图:
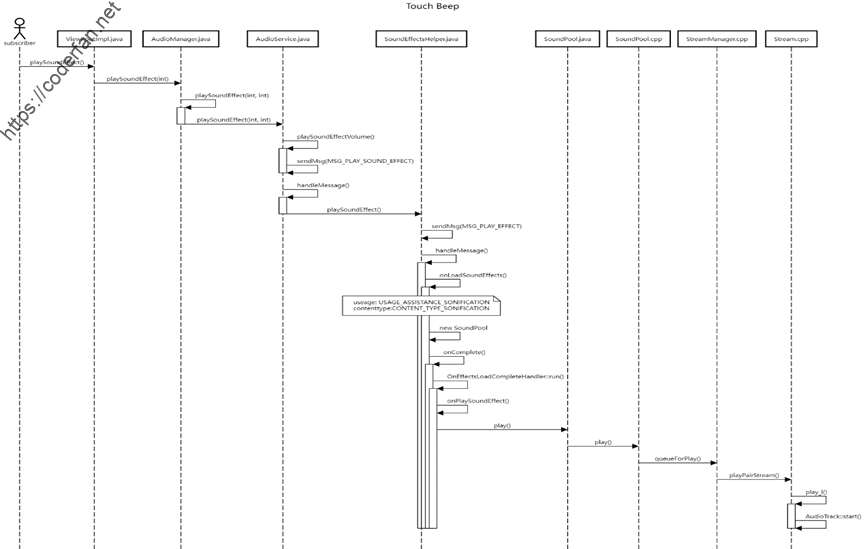
从这个活动图中,我们不难看出,按键音的实现最终是与View进行绑定的。当用户点击界面View控件时,Input事件经由InputFlinger中的Eventhub->InputReader->InputDispatcher传递至Java Framework中的InputManager,经由WindowManager分发至ViewRoot->ViewGroup->View,在View类中进行处理,源码实现位于frameworks/base/core/java/android/view/View.java文件内,我们可以找到onTouchEvent方法,代码如下:
 public boolean onTouchEvent(MotionEvent event) {
        final float x = event.getX();
        final float y = event.getY();
        final int viewFlags = mViewFlags;
        final int action = event.getAction();

        final boolean clickable = ((viewFlags & CLICKABLE) == CLICKABLE
                || (viewFlags & LONG_CLICKABLE) == LONG_CLICKABLE)
                || (viewFlags & CONTEXT_CLICKABLE) == CONTEXT_CLICKABLE;

        if ((viewFlags & ENABLED_MASK) == DISABLED
                && (mPrivateFlags4 & PFLAG4_ALLOW_CLICK_WHEN_DISABLED) == 0) {
            if (action == MotionEvent.ACTION_UP && (mPrivateFlags & PFLAG_PRESSED) != 0) {
                setPressed(false);
            }
            mPrivateFlags3 &= ~PFLAG3_FINGER_DOWN;
            // A disabled view that is clickable still consumes the touch
            // events, it just doesn't respond to them.
            return clickable;
        }
        if (mTouchDelegate != null) {
            if (mTouchDelegate.onTouchEvent(event)) {
                return true;
            }
        }

        if (clickable || (viewFlags & TOOLTIP) == TOOLTIP) {
            switch (action) {
                case MotionEvent.ACTION_UP:
                    mPrivateFlags3 &= ~PFLAG3_FINGER_DOWN;
                    if ((viewFlags & TOOLTIP) == TOOLTIP) {
                        handleTooltipUp();
                    }
                    if (!clickable) {
                        removeTapCallback();
                        removeLongPressCallback();
                        mInContextButtonPress = false;
                        mHasPerformedLongPress = false;
                        mIgnoreNextUpEvent = false;
                        break;
                    }
                    boolean prepressed = (mPrivateFlags & PFLAG_PREPRESSED) != 0;
                    if ((mPrivateFlags & PFLAG_PRESSED) != 0 || prepressed) {
                        // take focus if we don't have it already and we should in
                        // touch mode.
                        boolean focusTaken = false;
                        if (isFocusable() && isFocusableInTouchMode() && !isFocused()) {
                            focusTaken = requestFocus();
                        }

                        if (prepressed) {
                            // The button is being released before we actually
                            // showed it as pressed.  Make it show the pressed
                            // state now (before scheduling the click) to ensure
                            // the user sees it.
                            setPressed(true, x, y);
                        }

                        if (!mHasPerformedLongPress && !mIgnoreNextUpEvent) {
                            // This is a tap, so remove the longpress check
                            removeLongPressCallback();
                            if (!focusTaken) {
                                // Use a Runnable and post this rather than calling
                                // performClick directly. This lets other visual state
                                // of the view update before click actions start.
                                if (mPerformClick == null) {
                                    mPerformClick = new PerformClick();
                                }
                                if (!post(mPerformClick)) {
                                    performClickInternal();
                                }
                            }
                        }

                        if (mUnsetPressedState == null) {
                            mUnsetPressedState = new UnsetPressedState();
                        }

                        if (prepressed) {
                            postDelayed(mUnsetPressedState,
                                    ViewConfiguration.getPressedStateDuration());
                        } else if (!post(mUnsetPressedState)) {
                            // If the post failed, unpress right now
                            mUnsetPressedState.run();
                        }

                        removeTapCallback();
                    }
                    mIgnoreNextUpEvent = false;
                    break;
从这段代码中我们可以看到,当我们检测到按键处于按压状态后抬起时(Event由down->Up),需要执行PerformClick方法,其内部代码如图所示:
public boolean performClick() {
        // We still need to call this method to handle the cases where performClick() was called
        // externally, instead of through performClickInternal()
        notifyAutofillManagerOnClick();

        final boolean result;
        final ListenerInfo li = mListenerInfo;
        if (li != null && li.mOnClickListener != null) {
            playSoundEffect(SoundEffectConstants.CLICK);
            li.mOnClickListener.onClick(this);
            result = true;
        } else {
            result = false;
        }

        sendAccessibilityEvent(AccessibilityEvent.TYPE_VIEW_CLICKED);

        notifyEnterOrExitForAutoFillIfNeeded(true);

        return result;
    }
之后我们进入到playSoundEffect方法,一路回溯我们可以回溯到frameworks/base/core/java/android/view/ViewRootImpl.java文件中的 playSoundEffect 方法,其代码如下:
 public void playSoundEffect(@SoundEffectConstants.SoundEffect int effectId) {
        checkThread();

        try {
            final AudioManager audioManager = getAudioManager();

            if (mFastScrollSoundEffectsEnabled
                    && SoundEffectConstants.isNavigationRepeat(effectId)) {
                audioManager.playSoundEffect(
                        SoundEffectConstants.nextNavigationRepeatSoundEffectId());
                return;
            }

            switch (effectId) {
                case SoundEffectConstants.CLICK:
                    audioManager.playSoundEffect(AudioManager.FX_KEY_CLICK);
                    return;
                case SoundEffectConstants.NAVIGATION_DOWN:
                case SoundEffectConstants.NAVIGATION_REPEAT_DOWN:
                    audioManager.playSoundEffect(AudioManager.FX_FOCUS_NAVIGATION_DOWN);
                    return;
                case SoundEffectConstants.NAVIGATION_LEFT:
                case SoundEffectConstants.NAVIGATION_REPEAT_LEFT:
                    audioManager.playSoundEffect(AudioManager.FX_FOCUS_NAVIGATION_LEFT);
                    return;
                case SoundEffectConstants.NAVIGATION_RIGHT:
                case SoundEffectConstants.NAVIGATION_REPEAT_RIGHT:
                    audioManager.playSoundEffect(AudioManager.FX_FOCUS_NAVIGATION_RIGHT);
                    return;
                case SoundEffectConstants.NAVIGATION_UP:
                case SoundEffectConstants.NAVIGATION_REPEAT_UP:
                    audioManager.playSoundEffect(AudioManager.FX_FOCUS_NAVIGATION_UP);
                    return;
                default:
                    throw new IllegalArgumentException("unknown effect id " + effectId +
                            " not defined in " + SoundEffectConstants.class.getCanonicalName());
            }
        } catch (IllegalStateException e) {
            // Exception thrown by getAudioManager() when mView is null
            Log.e(mTag, "FATAL EXCEPTION when attempting to play sound effect: " + e);
            e.printStackTrace();
        }
    }
在这里我们可以看到,View中playSoundEffect最终会进入到AudioManager,在AudioManager中通过JNI调用SoundPool(/frameworks/base/media/jni/soundpool),再通过Stream.cpp中play_l()函数调用AudioTrack (/frameworks/av/media/libaudioclient)来进行按键音的播放。
if (mMuted) {
    newTrack->setVolume(0.0f, 0.0f);
} else {
     newTrack->setVolume(leftVolume, rightVolume);
}
newTrack->setLoop(0, frameCount, loop);
mAudioTrack->start();
mSound = sound;
mSoundID = sound->getSoundID();
mPriority = priority;
mLoop = loop;
mLeftVolume = leftVolume;
mRightVolume = rightVolume;
mRate = rate;
由此,我们可以很明显地看出,Android上层的按键音播放实际上都是由 libaudioclient 中的AudioTrack进行播放的。
既然我们已经了解到了原生按键音的实现方式,我们也可以仿照原生的按键音播放流程来进行播放,关键即在于AudioTrack的使用。
AudioTrack是Android Audio系统中很重要的一个基础,可以用于播放单一音源。不过需要注意的是,AudioTrack所播放的音源必须是原始的PCM流数据,而原生的按键音源为ogg格式,是经过了解码后再传递到AudioTrack内进行播放的。
在我们自己的实现中,我们可以提前将原始的ogg格式的按键音源使用外部的格式转换工具转换为wav格式,使用wav格式是因为wav格式的数据只需要经过简单解析就能得到原始的PCM数据流,然后调用AudioTrack进行播放即可。
在具体实现时,我们可以采用单例实现,即所有的按键音播放都通过一个实例来进行控制,在程序初始化过程中就将音源文件解析,获取原始的PCM数据。
当我们在接收到Input事件时,需要判断事件类型,当收到UP事件时,即开始播放按键音。这里为了避免阻塞UI响应,需要单独起线程来播放,播放结束则线程结束,自行销毁。
以上为一个整体的实现思路,接下来是具体的代码实现。
关于代码实现,这里仅提供部分关键代码。首先是音源文件的加载与解析:
bool TouchBeep::loadSoundResource(void)
{
    string TouchBeepWav(TOUCH_BEEP_RESOURCE_NAME);
    if (access(TouchBeepWav.c_str(), F_OK | R_OK) != 0)
    {
        LOGE("couldn't access TouchBeepSource[%s],error:%s", TouchBeepWav.c_str(), strerror(errno));
        return false;
    }
    mTouchBeepRes = fopen(TouchBeepWav.c_str(), "r");
    if (mTouchBeepRes == nullptr)
    {
        LOGE("cloudn't fopen TouchBeepSource[%s],error:%s", TouchBeepWav.c_str(), strerror(errno));
        return false;
    }
    char index[4] = { 0 };
    /*Header部分*/
    // 4字节序,ChunkId,其值总为RIFF,fread后会自动偏移
    fread(index, sizeof(char), 4, mTouchBeepRes);
    if ((index[0] != 'R') || (index[1] != 'I') || (index[2] != 'F') || (index[3] != 'F'))
    {
        LOGE("incorrect header,loadSoundResource failed");
        return false;
    }
    // 4字节ChunkSize
    fseek(mTouchBeepRes, 4, SEEK_CUR);
    // 4字节Format,其值总为WAVE
    fread(index, sizeof(char), 4, mTouchBeepRes);
    if ((index[0] != 'W') || (index[1] != 'A') || (index[2] != 'V') || (index[3] != 'E'))
    {
        LOGE("incorrect format,loadSoundResource failed");
        return false;
    }
    /*Format Chunk部分*/
    // 4字节Subchunk1ID
    fread(index, sizeof(char), 4, mTouchBeepRes);
    if ((index[0] != 'f') || (index[1] != 'm') || (index[2] != 't') || (index[3] != ' '))
    {
        LOGE("incorrect format,loadSoundResource failed");
        return false;
    }
    // 4字节Subchunk1Size,跳过
    fseek(mTouchBeepRes, 4, SEEK_CUR);
    // 2字节AudioFormat
    fread(index, sizeof(char), 2, mTouchBeepRes);
    if ((index[0] != 1) || (index[1] != 0))
    {
        LOGE("incorrect AudioFormat,loadSoundResource failed");
        return false;
    }
    // 2字节Channel Number
    fread(index, sizeof(char), 2, mTouchBeepRes);
    mChannelNum = index[0];
    // 4字节采样率
    fread(index, sizeof(char), 4, mTouchBeepRes);
    mSamplingRate = (static_cast<uint32_t>(index[0]) & 0xFF) + ((static_cast<uint32_t>(index[1]) & 0xFF) << 8U) + ((static_cast<uint32_t>(index[2]) & 0xFF) << 16U) + ((static_cast<uint32_t>(index[3] & 0xFF) << 24U));
    // 4字节ByteRate,跳过
    fseek(mTouchBeepRes, 4, SEEK_CUR);
    // 2字节BlockAlign
    fread(index, sizeof(char), 2, mTouchBeepRes);
    mFrameSize = index[0];
    mBitWidth = (index[0] / mChannelNum) << 3U;
    return true;
}
在加载音源文件后,我们需要逐字节读取其内容,解析出一些关键参数(需要了解wav的数据封装格式),如:通道数、采样率、帧大小与位宽等信息,这些信息都是后续需要的。
其次,我们根据上面得到的一些参数,来设置AudioTrack:
bool TouchBeep::prepareSoundTrack(void)
{
    LOGI("%s Entered", __FUNCTION__);
    if (!loadSoundResource())
    {
        LOGE("loadSoundResource failed,plz check");
        return false;
    }
    android::content::AttributionSourceState attributionSource;
    String16 opPackageName("com.example.touchbeep");
    attributionSource.packageName =
                 VALUE_OR_FATAL(legacy2aidl_String16_string(opPackageName));
    attributionSource.uid = VALUE_OR_FATAL(legacy2aidl_uid_t_int32_t(getuid()));
    attributionSource.pid = VALUE_OR_FATAL(legacy2aidl_pid_t_int32_t(getpid()));
    attributionSource.token = sp<BBinder>::make();
    mAudioTrack = new AudioTrack(attributionSource);
    if (mAudioTrack == nullptr)
    {
        LOGE("new AudioTrack failed, prepareSoundTrack failed");
        return false;
    }
    mAudioTrack->set(mStreamType, mSamplingRate, getResBitWidthType(), mChannelNum, 0, AUDIO_OUTPUT_FLAG_NONE);
    if (mAudioTrack->initCheck() != NO_ERROR)
    {
        LOGE("AudioTrack initCheck failed");
        return false;
    }
    mAudioTrack->setVolume(1.0, 1.0);
    LOGI("%s Exited", __FUNCTION__);
    return true;
}
最后是读取wav音源文件中的原始PCM数据,写入后播放:
void TouchBeep::sendDataFlow(void)
{
    LOGI("%s Entered", __FUNCTION__);
    if (mAudioTrack == nullptr)
    {
        LOGE("mAudioTrack is null");
        return;
    }
    // NOTE:here we will start send data
    mAudioTrack->start();
    if (mTouchBeepRes != nullptr)
    {
        int16_t readBuf[4];
        size_t readLen = 0;
        std::lock_guard<std::mutex> g(mResourceMutex);
        mWrittingData.store(true);
        while (mWrittingData && (feof(mTouchBeepRes) == 0))
        {
            readLen = fread(readBuf, 1, mFrameSize, mTouchBeepRes);
            if (readLen != 0)
            {
                mAudioTrack->write(readBuf, readLen, true);
            }
            // LOGI("read size is:%zu", readLen);
        }
        mAudioTrack->stop();
        // fclose(mTouchBeepRes);
        // mTouchBeepRes = nullptr;
        mWrittingData.store(false);
        fseek(mTouchBeepRes, 0, SEEK_SET);
    }
    LOGI("sendDataFlow finished");
}
在播放完成后,需要销毁AudioTrack与对于的音源文件。由于我们这里是单例实现,这部分操作建议放到析构函数中执行。
总的来说,要在Native中实现按键音方法还是有不少的,本博客中提到的这种方法只能算是其中一种,但这种方式存在一个缺点:当系统按键音调整时,Native侧无法及时做到同步,必须考虑额外的同步机制。除了博客中的这种方法外,也还可以通过写入模拟键值的方式将按键音的播放放到更底层去实现,这样Native服务只需要写入键值即可。
以上就是本篇博客的全部内容啦~